html tool

显示标签为“goagent”的博文。显示所有博文

2018年2月23日星期五

linux上socket5 proxy


基本安装过程参考

 https://github.com/junbaor/shell_script/blob/master/shadowsocks-chacha20.sh
[popexizhi:


apt update
apt install -y python-pip git gcc g++ make
pip install --upgrade pip
pip install setuptools
# pip install shadowsocks
pip install git+https://github.com/shadowsocks/shadowsocks.git@master apt install libsodium-devel 启动使用客户端命令见如下,不用"ssserver -c "$install_home"config.json -d start"
]

启动客户端遇到问题 

看到的问题:

socket.error problem: [Errno 99] Cannot assign requested address 

回答:
https://github.com/shadowsocks/shadowsocks/issues/298
[popexizhi:
sudo sslocal -c /etc/shadowsocks.json -d start instead of sudo ssserver .......

竟然遇到2015的cece的回答,好惊喜:)]

ubuntu的代理设置问题

看到的问题:
设置了http代理后,访问/var/log/shadowsocks.log中全部的都是

Unsupported SOCKS version: 67


https://github.com/shadowsocks/shadowsocks/issues/1086
[popexizhi:只加socks就ok了,其他不能写]


2017年10月16日星期一

server for Shadowsocks


https://medium.com/@zoomyale/%E7%A7%91%E5%AD%A6%E4%B8%8A%E7%BD%91%E7%9A%84%E7%BB%88%E6%9E%81%E5%A7%BF%E5%8A%BF-%E5%9C%A8-vultr-vps-%E4%B8%8A%E6%90%AD%E5%BB%BA-shadowsocks-fd57c807d97e


Shadowsocks 需要同时具备客户端和服务器端,所以它的部署也需要分两步。

3.1部署 Shadowsocks 服务器端

这里使用 teddysun 的一键安装脚本。
以下是3条命令,每次输入一行、回车,等待屏幕上的操作完成后再输入下一条。
wget --no-check-certificate https://raw.githubusercontent.com/teddysun/shadowsocks_install/master/shadowsocks.sh
chmod +x shadowsocks.sh
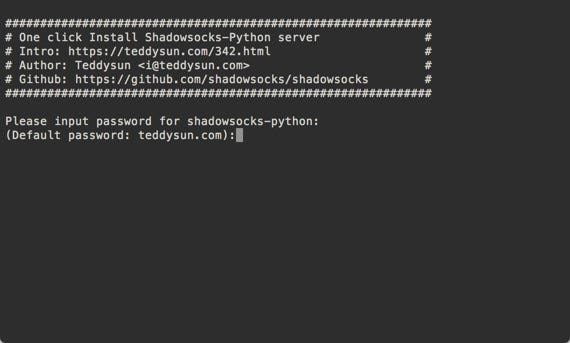
./shadowsocks.sh 2>&1 | tee shadowsocks.log
最后一步输完,你应该会看到下图中内容──是要你为 Shadowsocks 服务设置一个个人密码。
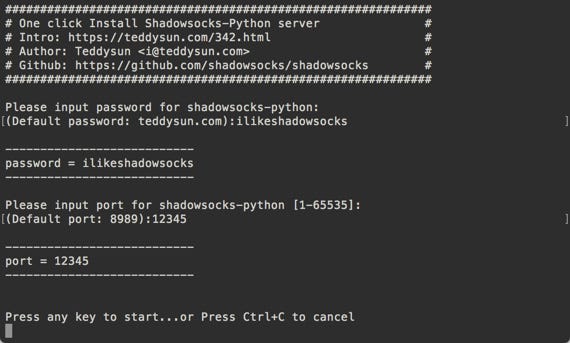
输好回车后会让你选择一个端口,输入 1–65535 间的数字都行。
遵照上图指示,按任意键开始部署 Shadowsocks。这时你什么都不用做,只需要静静地等它运行完就好。结束后就会看到你所部署的 Shadowsocks 的配置信息。
记住其中黄框中的内容,也就是服务器 IP、服务器端口、你设的密码和加密方式。

3.2 TCP Fast Open

实际上只要具备上述四个信息,你就可以在自己的任意设备上进行登录使用了。但是为了更好的连接速度,你还需要多做几步。
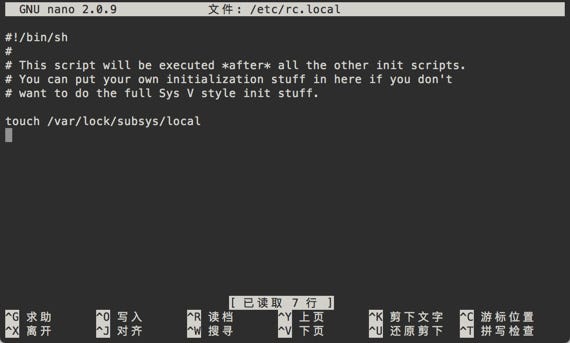
首先是打开 TCP Fast Open,输入以下命令,意为用 nano 这个编辑器打开一个文件。
nano /etc/rc.local
你的「终端」会刷新一下,出现下图。
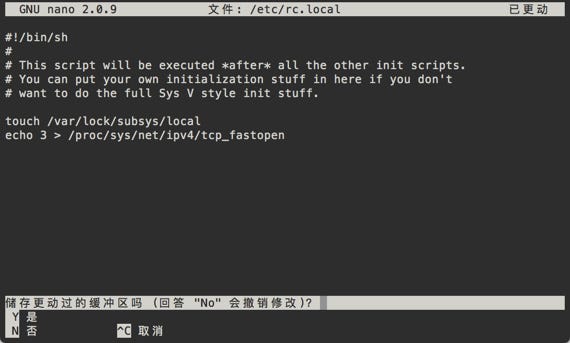
别慌张,它就是个文本编辑器。用方向键把光标移到最末端,粘贴下面这一行内容,然后按 Ctrl + X 退出。
echo 3 > /proc/sys/net/ipv4/tcp_fastopen
输入“Y”并回车确认退出。
然后依法炮制,输入:
nano /etc/sysctl.conf
在文末加上下面的内容,保存退出。
net.ipv4.tcp_fastopen = 3
再打开一个 Shadowsocks 配置文件。
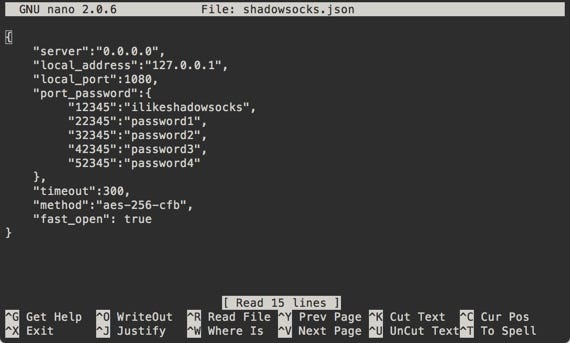
nano /etc/shadowsocks.json
把其中 “fast_open” 一项的 false 替换成 true。
"fast_open":true
如果你希望添加多用户的话,可以将 “password” 字段如下图修改。其中,“22345”:“password1”意为该用户使用 22345 端口、以“password1”为密码连接登录 Shadowsocks。
保存退出。最后,输入以下命令重启 Shadowsocks。
/etc/init.d/shadowsocks restart

2017年8月13日星期日

转:Chrome58最新版本Goagent使用问题解决

参考:http://yanke.info/?id=57#cmt15
PS :goagent local 本地版本升级:
https://github.com/out0fmemory/GoAgent-Always-Available 下载最新代码
替换 local中的proxy.ini 的配置,然后就pass 了


-------------------------------------------------------
  1.     1.删除已导入的证书文件(windows下运行certmgr.msc和certlm.msc,然后删除goagent证书;mac下在钥匙串中删除证书)
  2.     2.停止运行GoAgent(如果正在运行)
  3.     3.删除GoAgent根目录下的certs文件夹以及ca.crt证书文件
  4.     4.去掉GoAgent根目录proxylib.py            中#cert.add_extensions([OpenSSL.crypto.X509Extension(b'subjectAltName',True, ', '.join('DNS: %s' % x for x in sans))])一行的#号注释,见https://github.com/out0fmemory/GoAgent-Always-Available/blob/master/local/proxylib.py#L275
  5.     5.重新运行GoAgent,将会产生新的ca.crt证书
  6.     6.导入新生成的ca.crt证书,一般双击就可以了
  7.     7.刷新浏览器,此时应该可以使用了,enjoys!

2014年9月4日星期四

Ubuntu下Chrome中的goagent


参考地址:
http://dngood.blog.51cto.com/446195/1071767
http://teok.iteye.com/blog/1189412

升级家里的机子为【之前的太久了一直没更新】
Linux ubuntu 3.5.0-17-generic
chrome也直接安装最新的了,突然发现goagent连接不了了,
修改为google-chrome --proxy-server=127.0.0.1:8080 后 chrome用户登陆提示安全问题,导入CA证书也提示安全问题
-----------------------------------------------

8. 导入证书
安装证书导入工具
  1. apt-get install libnss3-tools 
将goAgent文件夹内的证书文件CA.crt导入(注意证书的绝对路)
  1. certutil -d sql:$HOME/.pki/nssdb -A -t TC -n "goagent" -i /home/dn/google_appengine/goagent-goagent-91cd5e4/local/CA.crt

2014年7月23日星期三

git for goagent

add:http://my.oschina.net/tearlight/blog/193913
增加代理
git config --global https.proxy "127.0.0.1:8089"
设置证书失效
git config --global http.sslVerify false

[?]
参考:http://deloz.net/1000000594.html
但是证书地址一直没有设置成功
提示“
E:\pc\other\thinking\learning\testgit\xizhi>git pull
fatal: unable to access 'https://popexizhi@code.google.com/p/xizhi/': error sett
ing certificate verify locations:
  CAfile: /F/pc/agent/local/local/CA.crt
  CApath: none

”

2014年7月22日星期二

goagent_local源码阅读_class Logging(type(sys))_II

 
      def __init__(self,*args,**kwargs):
        self.level = self.__class__.INFO //1
        self.__set_error_color = lambda: None
        self.__set_warning_color = lambda: None
        self.__set_debug_color = lambda: None
        self.__reset_color = lambda: None
        if hasattr(sys.stderr, 'isatty') and sys.stderr.isatty(): //2
            if os.name == 'nt': //3
                import ctypes //5
                SetConsoleTextAttribute = ctypes.windll.kernel32.SetConsoleTextAttribute //6
                GetStdHandle = ctypes.windll.kernel32.GetStdHandle //7
                self.__set_error_color = lambda: SetConsoleTextAttribute(GetStdHandle(-11), 0x04)//8
                self.__set_warning_color = lambda: SetConsoleTextAttribute(GetStdHandle(-11), 0x06) //9
                self.__set_debug_color = lambda: SetConsoleTextAttribute(GetStdHandle(-11), 0x002) //10
                self.__reset_color = lambda: SetConsoleTextAttribute(GetStdHandle(-11), 0x07) //11
            elif os.name == 'posix': //4
                self.__set_error_color = lambda: sys.stderr.write('\033[31m')//12     
                self.__set_warning_color = lambda: sys.stderr.write('\033[33m')
                self.__set_debug_color = lambda: sys.stderr.write('\033[32m')

                self.__reset_color = lambda: sys.stderr.write('\033[0m')  


12
sys.stderr.write
add:http://stackoverflow.com/questions/6195877/python-colour-printing-with-decorator-in-a-function
The simplest solution would be similar to what Pete suggest. Just print the escape codes before running the function to each of stderr and stdout. However, if both stderr and stdout feed the same terminal, as is usually the case, they will interfere
那就是在输出字符前直接定义颜色就可以了;
而颜色用的是ANSI的color的定义
add:http://en.wikipedia.org/wiki/ANSI_escape_code#Colors
有详细的说明,这里的例子是ls下的看来linux在shell中直接就定义这样使用
]
这个_init__是对不同os下的日志打印颜色做定义用的,日志区分为:
error
warni
debug
reset

级别     

2014年7月15日星期二

goagent_local源码阅读_class Logging(type(sys))_I


def __init__(self,*args,**kwargs):
        self.level = self.__class__.INFO //1
        self.__set_error_color = lambda: None
        self.__set_warning_color = lambda: None
        self.__set_debug_color = lambda: None
        self.__reset_color = lambda: None
        if hasattr(sys.stderr, 'isatty') and sys.stderr.isatty(): //2
            if os.name == 'nt': //3
                import ctypes //5
                SetConsoleTextAttribute = ctypes.windll.kernel32.SetConsoleTextAttribute //6
                GetStdHandle = ctypes.windll.kernel32.GetStdHandle //7
                self.__set_error_color = lambda: SetConsoleTextAttribute(GetStdHandle(-11), 0x04)//8
                self.__set_warning_color = lambda: SetConsoleTextAttribute(GetStdHandle(-11), 0x06) //9
                self.__set_debug_color = lambda: SetConsoleTextAttribute(GetStdHandle(-11), 0x002) //10
                self.__reset_color = lambda: SetConsoleTextAttribute(GetStdHandle(-11), 0x07) //11
            elif os.name == 'posix': //4
                self.__set_error_color = lambda: sys.stderr.write('\033[31m')//12
                self.__set_warning_color = lambda: sys.stderr.write('\033[33m')
                self.__set_debug_color = lambda: sys.stderr.write('\033[32m')
                self.__reset_color = lambda: sys.stderr.write('\033[0m')

[popexizhi:
1.__class__ is the instance’s class ,        self.level = self.__class__.INFO 是引用类的全局变量INFO = 20
2.hasattr(sys.stderr, 'isatty') 检查sys.stderr.isatty是存在的,and sys.stderr.isatty()如果存在这个那就检查一下是否为tty设备
sys.stderr linux中错误的输出流,下面是help的说明
The objects sys.stdin, sys.stdout and sys.stderr are initialized to file objects corresponding to the interpreter’s standard input, output and error streams. See File Objects for complete documentation of file objects
这个是file objects中关于isatty的说明
file.isatty()
Return True if the file is connected to a tty(-like) device, else False.
Note
If a file-like object is not associated with a real file, this method should not  be implemented
go了一下tty文件: 应该是特殊的虚拟终端或端口设备文件的检查
http://oss.org.cn/kernel-book/ldd3/ch18.html
http://flykof.pixnet.net/blog/post/24277709-%5B%E8%BD%89%E8%BC%89%E6%95%B4%E7%90%86%5Dwhat-is-tty%3F
3.“nt”及windows系列的操作系统
4.'posix' 及unix类的操作系统
5.
import ctypes [help]
ctypes is a foreign function library for Python. It provides C compatible data types, and allows calling functions in DLLs or shared libraries. It can be used to wrap these libraries in pure Python

6. SetConsoleTextAttribute = ctypes.windll.kernel32.SetConsoleTextAttribute 的介绍
add:http://msdn.microsoft.com/en-us/library/ms686047(VS.85).aspx
Sets the attributes of characters written to the console screen buffer by the WriteFile or WriteConsole function, or echoed by the ReadFile or ReadConsolefunction. This function affects text written after the function call.
这个是windows的文本或控制台写入属性的设置函数c++的函数头如下:
Syntax
C++
BOOL WINAPI SetConsoleTextAttribute(
  _In_  HANDLE hConsoleOutput,
  _In_  WORD wAttributes
);

Parameters
hConsoleOutput [in] :A handle to the console screen buffer. The handle must have the GENERIC_READ access right. For more information, see Console Buffer Security and Access Rights.
wAttributes [in] :The character attributes.
地址中有详细的此函数的来源,返回值,参数等等内容,windows提供的内容

7. GetStdHandle = ctypes.windll.kernel32.GetStdHandle
add:http://msdn.microsoft.com/en-us/library/ms683231(v=vs.85).aspx
Retrieves a handle to the specified standard device (standard input, standard output, or standard error).
原来windows也有input,output and error.之前在shell中使用以为只有linux做了相关区分呢,看来自己对win32的系统还真是不熟悉:)
看原文的参数说明
下面的-11使用的就是output [GetStdHandle(-11)]
STD_OUTPUT_HANDLE
(DWORD)-11   :The standard output device. Initially, this is the active console screen buffer, CONOUT$.
[8,9,10,11]
add:http://www.cnblogs.com/morewindows/archive/2011/09/19.html [这个是自己设置用c++的过程]
add:http://openexz.sinaapp.com/2011/02/17/%E8%BD%ACcc%E6%8E%A7%E5%88%B6%E5%8F%B0%E8%BE%93%E5%87%BA%E6%97%B6%E8%AE%BE%E7%BD%AE%E5%AD%97%E4%BD%93%E5%8F%8A%E8%83%8C%E6%99%AF%E9%A2%9C%E8%89%B2/[这个有详细的颜色定义]
这样翻译过来就是
8  error_color 定义背景色黑色 ,字体red[4]
9 warning_color定义背景色黑色,字体黄色[6]
10 debug_color 定义背景色黑色,字体绿色[2]
11 reset_color 定义背景色黑色,字体蓝色[1]
12[next]

       ]