html tool

显示标签为“jenkins”的博文。显示所有博文

2022年11月3日星期四

jenkins插件:rigger parameterized build on other projects 子job参数通过文件传递

 https://www.cxyzjd.com/article/u013168025/102972693

问题:

jenkins 子job 调用时,无法传递shell中定义或修改的变量,只能使用job的入参或者环境变量(Parameterized Trigger Plugin插件问题)

问题分析:

插件可以实现Job间参数传递但是有局限性,我们只能选择传递当前build的参数或者环境变量。而且这个变量只能是上级job中参数化时传入的,shell中进行了修改也不会改变。如果要传递一个自定义的变量怎么办呢? 构建步骤中的自定义变量在执行结束后都会被回收,我们不可能在"predefined parameters"中取到

解决:

通过properties file的方式传递参数(仍然需要插件:Parameterized Trigger Plugin)

现有上游job:[test-file-parameters] 和下游job:[test-job] 

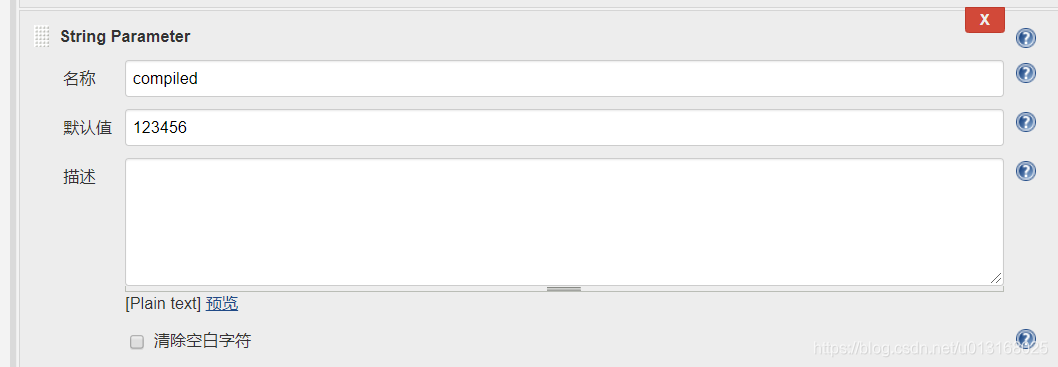
在[test-file-parameters]中有参数:compiled 默认值:123456
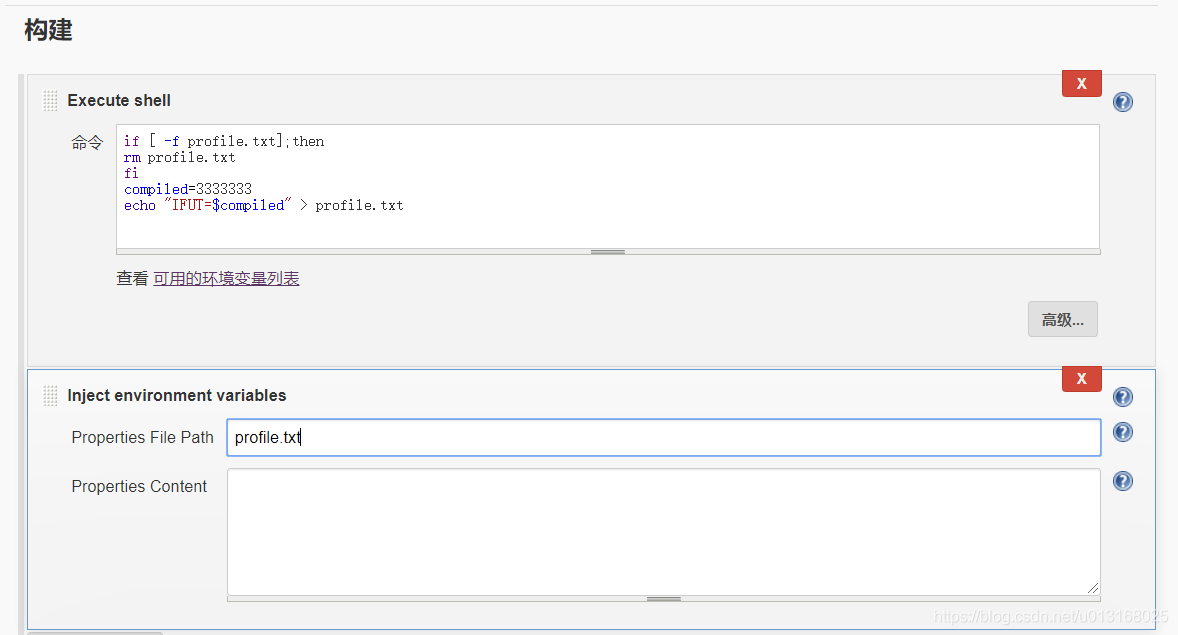
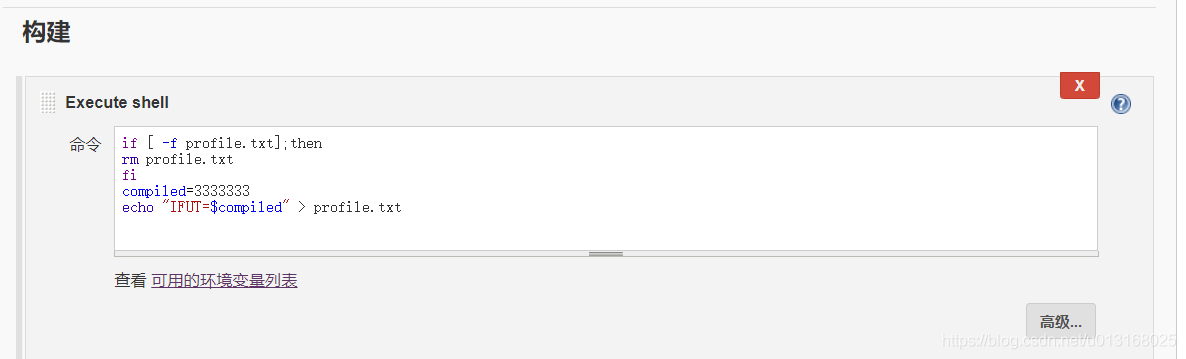
删除原来老的数据 然后可以对变量进行一些操作之后,然后以"xx=xx"的样式写入到配置文件『propfile.txt』中。

IFUT=$compiled  IFUT是下游job test-job里的变量  compiled是上游job test-file-parameter里的变量
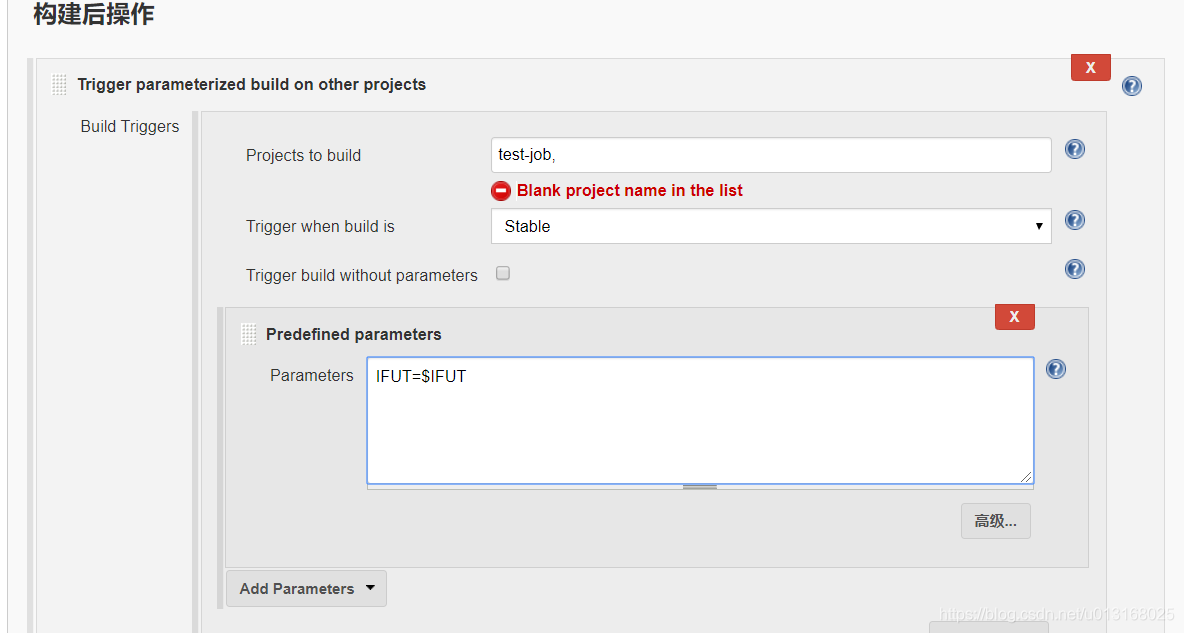
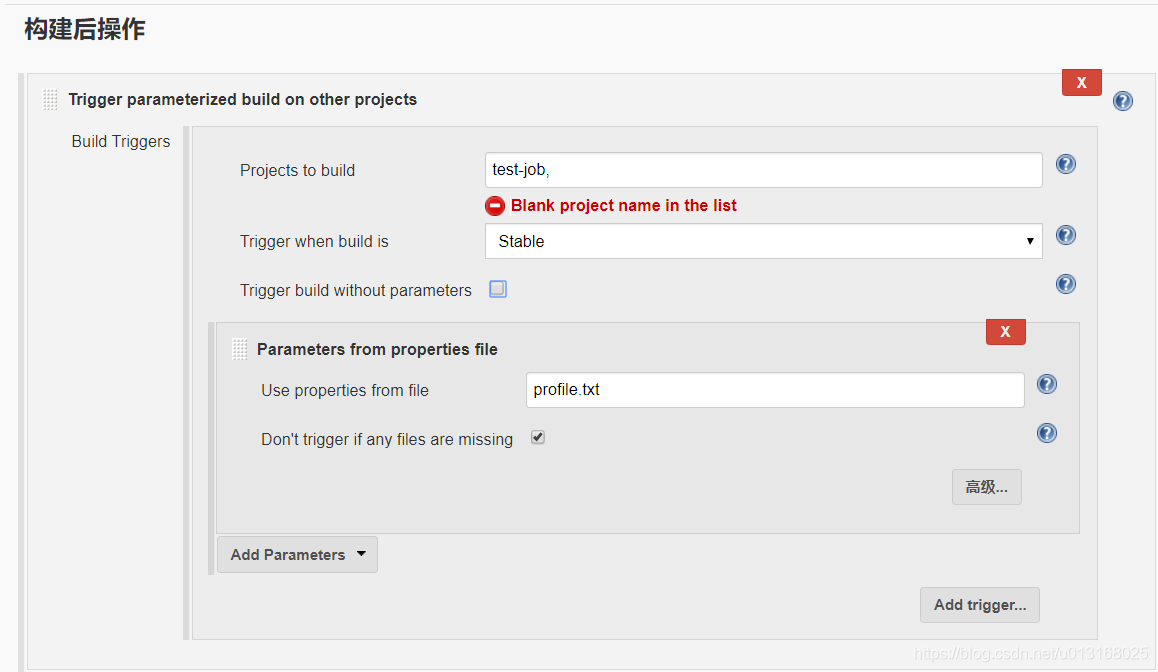
然后在"Trigger parameterized build on other projects"中选择"Parameters from preperties file",在propfile里写入多个变量就可以传递多个值。
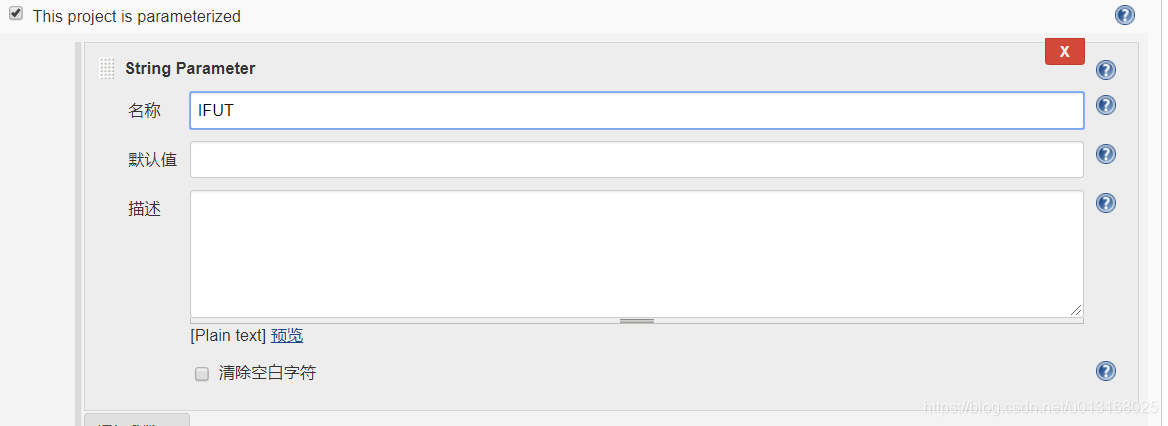
在[test-job]中有参数 IFUT  这个值要和profile.txt里的key值一样 否则无法传递
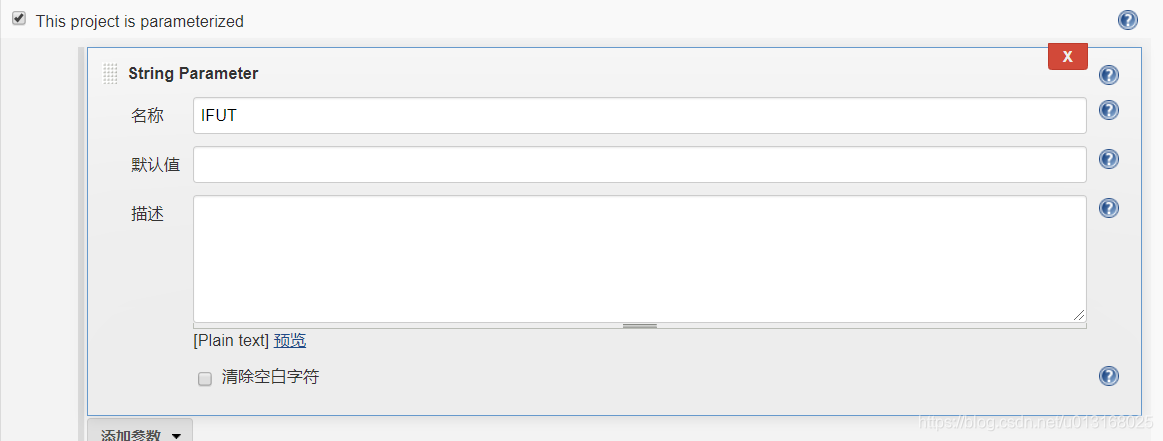
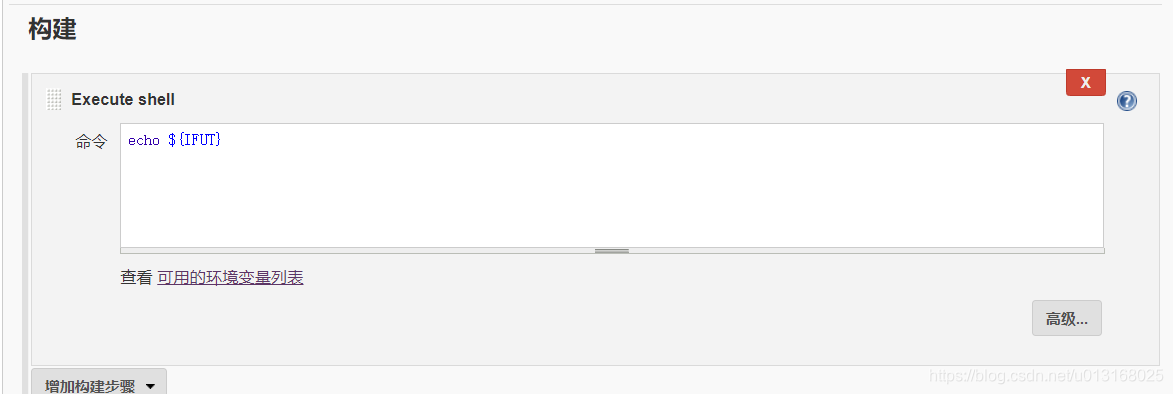
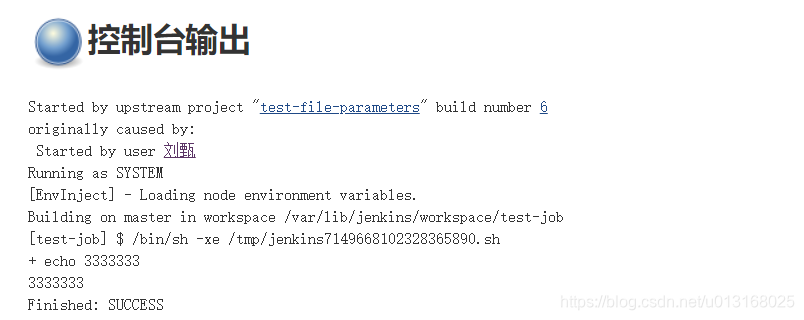
查看一下IFUT最终的值 是不是上游job中shell里修改成的3333333
构建上游job:[test-file-parameter] 构建成功之后会触发test-job 传递自定义变量成功!


jenkins 插件:Environment Injector 插件

 https://www.cnblogs.com/yoyoketang/p/14955965.html

问题:jenkins 子job 调用时,无法传递shell中定义或修改的变量,只能使用job的入参或者环境变量(Parameterized Trigger Plugin插件问题)

问题分析:

插件可以实现Job间参数传递但是有局限性,我们只能选择传递当前build的参数或者环境变量。而且这个变量只能是上级job中参数化时传入的,shell中进行了修改也不会改变。如果要传递一个自定义的变量怎么办呢? 构建步骤中的自定义变量在执行结束后都会被回收,我们不可能在"predefined parameters"中取到

解决方式:

使用Environment Injector 插件,

在shell中将变量写入环境变量,如下:

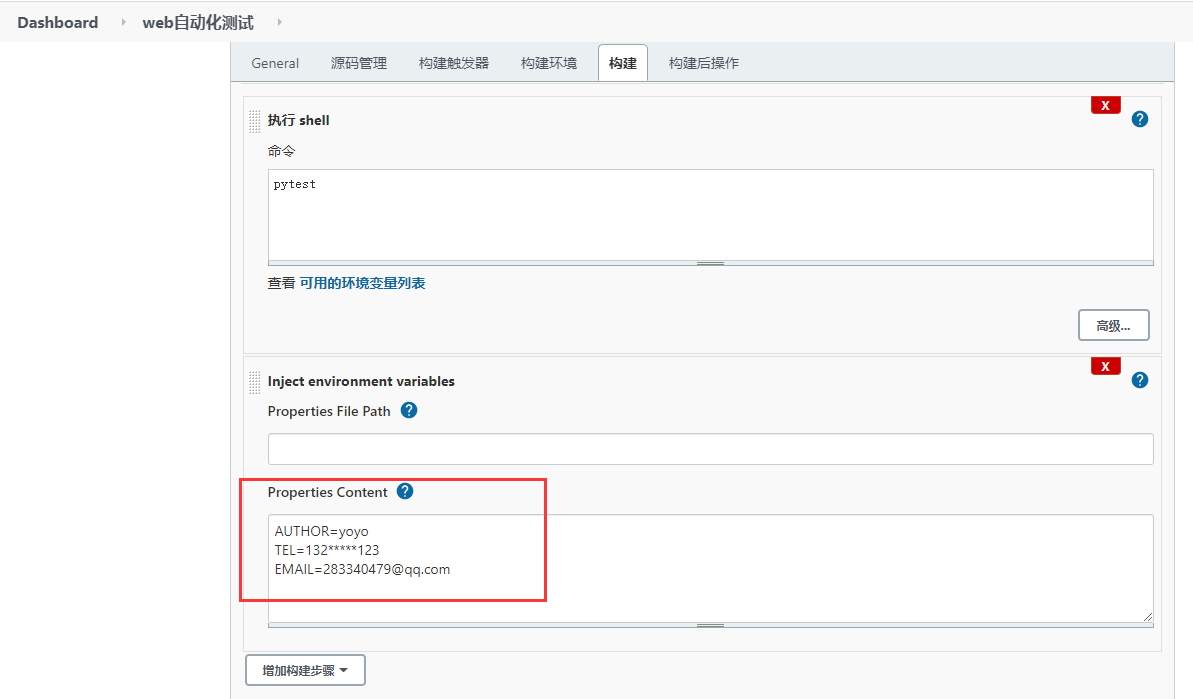
Properties Content 自定义环境变量

添加构建步骤 - Inject environment variables

Properties Content 可以写成如下键值对的格式

AUTHOR=yoyo
TEL=132*****123
EMAIL=283340479@qq.com

在邮件报告模板中引用环境变量

于是收到的邮件,就会有相关信息


参考:https://www.cxyzjd.com/article/u013168025/102972693

EnvInject Plugin可以支持修改、注入和删除环境变量。

同样添加shell脚本,变量传递

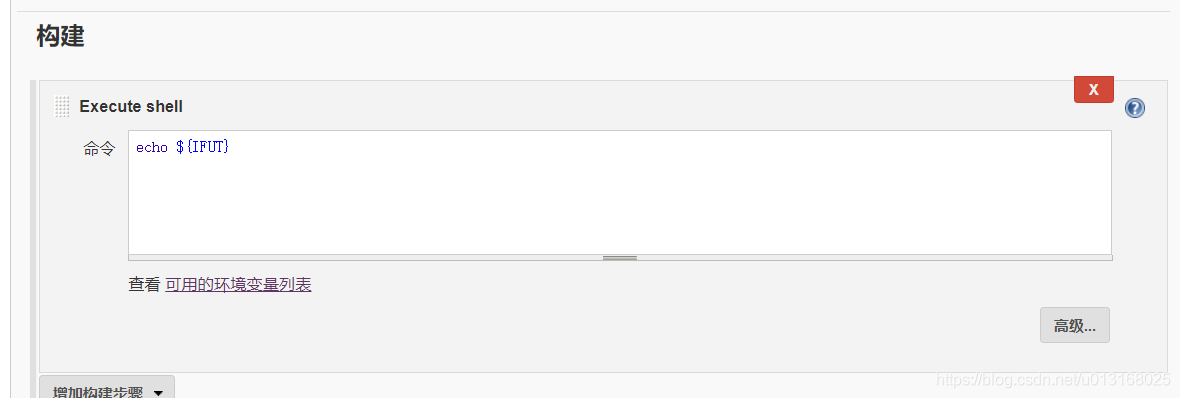
我们在构建中增加步骤"Inject environment variables", 将写在配置文件中的变量${IFUT},注入到环境变量里。

在"Trigger parameterized build on other projects"就可以直接选择"predefined parameters"方式直接传递变量了。


同样的在Job『test-job』里就可以直接访问变量${IFUT}了。

       上面两种方法,都是通过profile.txt文件的方式,通过这个配置,可以将自定义的变量值不仅能传递,而且还能自定义修改值。这样的话,当上游需要传递一个自定义变量,这个变量又是通过shell脚本中修改过的,就可以使用profile.txt方式。

2021年7月16日星期五

转:jenkins crumb


https://lzzeng.github.io/cicd/how-to-use-jenkins-api-in-shell-part2/


c=`curl -u admin:xxxxx   'http://${ip}/crumbIssuer/api/xml?xpath=concat(//crumbRequestField,":",//crumb)'`

curl -u admin:xxxxx -X POST  'http://${ip}/job/pipeline_test_t/build' --data-urlencode json='{"parameter":[{"name":"run_num","value":"2"},{"name":"list", "value":"[\"a\",\"b\"]"}]}'  

HTTP Error 403: No valid crumb was included in the request Reason: No valid crumb was included in the request

 https://www.it-swarm-ja.com/ja/jenkins/jenkins-2192%EF%BC%9Ahttp%E3%82%A8%E3%83%A9%E3%83%BC403%EF%BC%9A%E3%83%AA%E3%82%AF%E3%82%A8%E3%82%B9%E3%83%88%E3%81%AB%E6%9C%89%E5%8A%B9%E3%81%AA%E3%82%AF%E3%83%A9%E3%83%A0%E3%81%8C%E5%90%AB%E3%81%BE%E3%82%8C%E3%81%A6%E3%81%84%E3%81%BE%E3%81%9B%E3%82%93/812423170/

我最近升級到 Jenkins 2.192,應用程序開始失敗並出現以下錯誤:


HTTP Error 403: No valid crumb was included in the request

Reason: No valid crumb was included in the request

方法一

降級到 Jenkins 2.189 後,沒有問題。詹金斯 2.189、2.190、2.191 沒有問題。我在 Jenkins 2.192 上遇到了問題(也見於 2.196)

2.191和2.192之間有變化,這就是我觀察到的錯誤原因

方法二

一個不需要任何源代碼更改的簡單解決方案(經 Jenkins v2.222 驗證):

安裝 Strict Crumb Issuer 插件 ( https://plugins.jenkins.io/strict-crumb-issuer/ )

啟用此插件並從其配置中取消選中“檢查會話 ID”(Jenkins 配置全局安全性)

缺點是此解決方案依賴於 Strict Crumb Issuer 插件並刪除了安全功能。但是,這是可以接受的,因為我們的應用程序需要許多其他插件,並且僅在沒有互聯網訪問權限的防火牆後面運行


转:jenkins api for job

 https://www.cnblogs.com/wozijisun/p/12324325.html

9、直接调用Jenkins的job API进行构建的方法
Simple example - sending "String Parameters":

curl -X POST JENKINS_URL/job/JOB_NAME/build \
  --user USER:TOKEN \
  --data-urlencode json='{"parameter": [{"name":"id", "value":"123"}, {"name":"verbosity", "value":"high"}]}'
Another example - sending a "File Parameter":

curl -X POST JENKINS_URL/job/JOB_NAME/build \
  --user USER:PASSWORD \
  --form file0=@PATH_TO_FILE \
  --form json='{"parameter": [{"name":"FILE_LOCATION_AS_SET_IN_JENKINS", "file":"file0"}]}'
 

2021年7月14日星期三

转:Convert String variable to a List [Groovy]

https://stackoverflow.com/questions/15125003/convert-string-variable-to-a-list-groovy/29675035

 def ids = "[10, 1, 9]"

def l = Eval.me(ids)


转:jenkins pipeline string to integer

 https://stackoverflow.com/questions/1713481/converting-a-string-to-int-in-groovy

Use the toInteger() method to convert a String to an Integer, e.g.

int value = "99".toInteger()

2021年7月2日星期五

转:jenkins -agent的“[SSH] WARNING: No entry currently exists in the Known_hosts file for this host. Connections will be denied until this new host and its associated key is added to the Known Hosts file.”处理


问题:jenkins 2.2.89 aget启动提示 错误如下:

[SSH] WARNING: No entry currently exists in the Known_hosts file for this host. Connections will be denied until this new host and its associated key is added to the Known Hosts file.

解决:

参考:https://support.cloudbees.com/hc/en-us/articles/115000073552-host-key-verification-for-ssh-agents

agent的配置中Host Key Verification

选择:

  • Non verifying Verification Strategy: legacy behavior, no host key verification

2021年4月14日星期三

pipeline的stage显示失败但继续运行

 参考:https://www.thinbug.com/q/44022775

很长时间以来,我一直在寻找答案,但我发现了一个破解方法!我把try / catch块放在了整个阶段:

 try {
   stage('some-stage') {
         //do something
   }
 } catch (Exception e) {
    echo "Stage failed, but we continue"  
 }
 try {
   stage("some-other-stage") {  // do something }
 } catch (Exception e) {
    echo "Stage failed, but we still continue"
 }

结果是您将获得以下内容: enter image description here

这仍然不是理想的,但是它给出了必要的结果。

2021年4月11日星期日

ThinBackup for jenkins backup

 参考: https://blog.51cto.com/innocence/2316315

一.jenkins备份

这里我通过的是thinbacp插件对jenkins进行备份与恢复

1.安装ThinBackup 插件

系统管理--->插件管理---->可选插件--->(过滤里面输入ThinBackup进行查找)


2.配置ThinBackup

系统管理--->ThinBackup--->Settings

参数说明

 备份目录
指定备份目录。Jenkins进程需要对此目录的写访问权。您可以使用$ {JENKINS_WORKSPACE}等环境变量来指定路径。

完整备份的备份计划
指定触发完整备份的计划。使用Cron表示法。即使没有更改,完整备份也会备份所有文件。

差异备份的备份计划
指定触发差异备份的计划。使用Cron表示法。差异备份仅存储自上次完全备份以来修改的数据。如果未检测到任何更改,则不会创建差异备份。

注意:如果只需要完整备份,则无需指定差异备份计划。由于差异备份依赖于完整备份,因此如果指定差异备份计划,则必须提供完整备份计划。

等到Jenkins / Hudson闲置以执行备份
建议启用此选项(默认)。然而,许多用户报告说安静模式阻止了长时间运行的作业的执行。如果禁用此选项,则无需等待实例的安全状态即可进行备份。换句话说,备份将立即完成,这可能导致损坏的备份。

在指定的分钟后强制Jenkins进入完全模式
在指定的时间(分钟)后强制安静模式,以强制安全的备份环境。零表示在调度程序触发备份时直接强制执行完全模式。阅读下面有关备份过程的更多信息。

最大备份集数
要节省磁盘空间,可以指定存储的最大备份集数。备份集定义为完整备份及其引用差异备份。在下一次完整备份操作后,将删除较旧的备份集。这也适用于压缩备份集。

备份中排除的文件
如果您有特定文件而不想备份,则在此处输入标识这些文件的正则表达式将阻止它们被备份。名称与此正则表达式匹配的所有文件都不会被备份。如果不需要,请留空。如果表达式无效,则将忽略该表达式。

备份构建结果
如果启用此选项,则还将备份构建结果。这可能是很多数据,所以要仔细考虑它。一旦您决定备份构建结果,您还可以选择备份构建存档。再次注意这个选项,因为它可能非常耗时并且可能需要大量的磁盘空间!

备份'userContents'
Jenkins提供了一个URL,您可以在其中放置常用数据(例如静态HTML,工具......)。如果选中此选项,则可以备份所有这些数据。

备份仅构建标记为保留
如果启用此选项,则仅备份标记为“永久保留此构建”的构建的结果/工件。

清理差异备份
如果启用此选项,则只要完成新的完整备份,就会删除所有差异备份。

将旧备份移动到ZIP文件
如果选中此选项,则每当执行新的完整备份时,所有旧备份集都将移动到ZIP文件。每个ZIP文件将包含一个备份集,即一个完整备份和引用它的任何差异备份。文件名将标识包含备份的时间范围(即完整备份的时间戳和最新差异备份的时间戳)。

注意: “ 最大备份集数”设置也适用于由thinBackup创建的备份ZIP文件。

注意:如果选中“ 清理差异备份 ”,则在完成压缩之前将执行diff清理,因此ZIP文件中不会进行差异备份。

二.jenkins 还原

注意:为检测还原是否生效,在此我删除了一个pipline项目然后进行还原

1.还原进行测试:

注意:还原后对jenkins 进行重启才能生效

2021年4月7日星期三

解决:MissingPropertyException: No such property: props for class: groovy.lang.Binding

 https://stackoverflow.com/questions/63975674/groovy-lang-missingpropertyexception-no-such-property-props-for-class-groovy

问题:MissingPropertyException: No such property: props for class: groovy.lang.Binding

code: jenkins-pipeline

def jobes = [:]

def lists=["xls","doc","ole","exe86"]

/*def res_dic = readJSON text: '''

{

    "xls":"xls/as",

    "doc":"doc/as",

    "ole":"ole/as",

    "exe86":"exe86/as"

}

'''

*/

node("192.168.120.100"){

    def props = readJSON file: '/home/sandbox/lj_test/code_backup/input.json'

}

def total=lists.size()

for (int i = 20; i >15; i--) {

//for (i in lists){

  def sandbox_id = i

  def sample=lists[i-20]

  def res_d = res_dic["${sample}"]

  def props_d = props["${sample}"]

解决:

Your definition of the variable props is inside the try-catch:

try {
    def props =  readJSON text: env.hb_job_params
    ...
}

But later, you try to use it in props.get(application_server) and that variable does not exist anymore at that point


修改后:

def jobes = [:]

def lists=["xls","doc","ole","exe86"]

/*def res_dic = readJSON text: '''

{

    "xls":"xls/as",

    "doc":"doc/as",

    "ole":"ole/as",

    "exe86":"exe86/as"

}

'''

*/

def props = readJSON text: """ {} """

node("192.168.120.100"){

    props = readJSON file: '/home/sandbox/lj_test/code_backup/input.json'


}

def total=lists.size()

for (int i = 20; i >15; i--) {

//for (i in lists){

  def sandbox_id = i

  def sample=lists[i-20]

  def res_d = res_dic["${sample}"]

  def props_d = props["${sample}"]

...

解决:MissingContextVariableException: Required context class hudson.FilePath is missing

 https://stackoverflow.com/questions/42380712/jenkins-pipeline-conditional-stage-succeeds-but-jenkins-shows-build-as-failed

问题: 

MissingContextVariableException: Required context class hudson.FilePath is missing

code:  jenkins-pipeline 

def jobes = [:]

def lists=["xls","doc","ole","exe86"]

def  props = readJSON file: '/home/sandbox/lj_test/code_backup/input.json'

def total=lists.size()

for (int i = 20; i >15; i--) {

  def sandbox_id = i

  def sample=lists[i-20]

  def props_d = props["${sample}"]

...

}

解决:

So after looking more closely at the log file it helped me to track down the problem.

It's worth noting that clicking on the build stage to view the logs is what threw me - this is what I had been doing. When I actually went to the full console log output i saw the error about:

Required context class hudson.FilePath is missing
Perhaps you forgot to surround the code with a step that provides this, such as: node

Underneath the node {} section that I had I had a statement for deploys:

def branch = readFile('branch').trim()
if (branch == master) {
    ...
}

The problem was that the readFile statement was defined outside of a node.

The answer was to put the readFile statement within a node {} section.


转: java.lang.NoSuchMethodError: No such DSL method 'readJSON'

 https://stackoverflow.com/questions/46841877/java-lang-nosuchmethoderror-no-such-dsl-method-readjson


Using Pipeline Utility Steps Plugin you can use the readJSON function.

def props = readJSON text: '{ "key": "value" }'

2021年4月1日星期四

處理:SSH Connection failed with IOException: "Key exchange was not finished, connection is closed.", retrying in 15 seconds. There are 8 more retries left.

問題:SSH Connection failed with IOException: "Key exchange was not finished, connection is closed.", retrying in 15 seconds. There are 8 more retries left.

https://www.edureka.co/community/70621/connection-ioexception-exchange-finished-connection-retrying

To avoid this error, you have to set your Host Key Verification Strategy in Jenkins. By default when Jenkins try to connect with remote node via SSH, it will ask for permission. You can set Host Key Verification Strategy with Non verifying Verification Strategy.

2020年9月28日星期一

jenkins pipeline 并行eg

参考:https://www.jenkins.io/doc/pipeline/examples/#jobs-in-parallel 


def branches=[:]     #定义并行的结构,相当于运行的容器吧,这后面的parallel branches想呼应

#下面定义每一个的branche 

    branches["branch1"] = { 

        node("192.168.100.121"){  //使用node指定这个job的运行位置

            stage("run1"){               //stage是最后在运行结果页显示步骤列的位置用,这个测试要在执行脚本的上一级,但不能再node上

            build job: 'param1', parameters:[   //要运行的其他job 及其参数

                string(name:"hi",value:"1")

            ]}

        }


    }


    branches["branch2"] = {

        node("192.168.100.121I"){

            stage("run2"){

            build job: 'param2', parameters:[

                string(name:"hi",value:"2")

            ]}

            }


    }

parallel branches

2020年6月2日星期二

问题记录: jenkins +robot 报告处理失败

奇怪问题记录:
jenkins +robot 
生成结果报告提示
Robot results publisher started...
-Parsing output xml:
Done!
-Copying log files to build dir:
Failed!

在对应的目录可以看到生成的报告,但是在jenkins无法访问,这个是统计过程出现问题引起的吗?

2018年10月21日星期日

jenkins取消匿名用户权限方法


https://blog.csdn.net/peterxiaoq/article/details/76222406

1.登录Jenkins服务器,进入“系统管理”,系统会提示启用身份验证,点击“安全设置”进入系统全局安全设置界面;
2.勾选“启用安全”,“访问控制”>“安全域”选择“Jenkins专有用户数据库”,并勾选“允许用户注册”;
3.“访问控制”>“授权策略”选择“项目矩阵授权策略”,将匿名用户设置为只读权限,并新增系统管理员admin拥有全部管理权限

2018年4月20日星期五

转:以root用户运行jenkins中shell命令


修改用户方式: https://blog.csdn.net/wzqnls/article/details/78506149
修改jenkins用户权限方式: https://blog.csdn.net/lanfan_11/article/details/50772291


1.将jenkins账号分别加入到root组中 gpasswd -a root jenkins 2.修改/etc/sysconfig/jenkins文件中, # user id to be invoked as (otherwise will run as root; not wise!) JENKINS_USER=root JENKINS_GROUP=root 可以修改为root权限运行 3.重启Jenkins service Jenkins restart 4.验证 在Jenkins中的shell脚本中执行命令 whoami
---------------------------------------------------------------------------------

修改Jenkins配置文件

# 打开配置文件
vim /etc/sysconfig/jenkins
# 修改$JENKINS_USER,并去掉当前行注释
$JENKINS_USER="root"
  • 1
  • 2
  • 3
  • 4

修改Jenkins相关文件夹用户权限

chown -R root:root /var/lib/jenkins
chown -R root:root /var/cache/jenkins
chown -R root:root /var/log/jenkins
  • 1
  • 2
  • 3

重启Jenkins服务并检查运行Jenkins的用户是否已经切换为root

# 重启Jenkins(若是其他方式安装的jenkins则重启方式略不同)
service jenkins restart
# 查看Jenkins进程所属用户
ps -ef | grep jenkins
# 若显示为root用户,则表示修改完成

2018年4月9日星期一

转:jenkins服务器上要支持robotframkework


参考:http://www.foryouslg.com/blog/13/118/
[popexizhi:原文写的很死板,其实安装了robotframkework 的jenkins 插件后
在构建后操作中选择 Publish Robot Framework test results,配置其中的output路径为html的输出结果路径就可以了。
注意: 这个位置与构建过程的脚本中参数不能通用,要使用变量只能用全局变量或者构建参数中的变量
]

2018年4月7日星期六

jenkins默认密码修改


参考:https://www.jianshu.com/p/e8bc90a1aad8
重启jenkins
/etc/init.d/jenkins restart

进入并且备份原始文件
root@pts/0 $ cd /var/lib/jenkins/users/
root@pts/0 $ ls -l
total 20
drwxr-xr-x 2 jenkins jenkins 4096 Jun 12 10:43 admin
root@pts/0 $ cd admin/
root@pts/0 $ ls -l
total 16
-rw-r--r-- 1 root root 4701 Jun 12 10:43 config.xml
root@pts/0 $ cp -a config.xml config.xml.20160612 
root@pts/0 $ ls -l
total 16
-rw-r--r-- 1 root root 4701 Jun 12 10:43 config.xml
-rw-r--r-- 1 root root 4681 Jun 11 13:51 config.xml.20160612


作者:全栈运维
链接:https://www.jianshu.com/p/e8bc90a1aad8
來源:简书
著作权归作者所有。商业转载请联系作者获得授权,非商业转载请注明出处。

修改config.xml,找到 passwordHash部分,替换原有的hash值
原始文件:

Jenkins-admin-psw-hash.png

修改
#jbcrypt:$2a$10$QqzUz7kc8U8wkc5vexlxnuw5umudQj7A.0NmuZPrGMaq3qaV5m7hi
为
#jbcrypt:$2a$10$DdaWzN64JgUtLdvxWIflcuQu2fgrrMSAMabF5TSrGK5nXitqK9ZMS
后者是111111的hash值


作者:全栈运维
链接:https://www.jianshu.com/p/e8bc90a1aad8
來源:简书
著作权归作者所有。商业转载请联系作者获得授权,非商业转载请注明出处。